Eye-catching and professional-looking graphics are essential for making an impact on social media.
In an increasingly visual world, the imagery you use to represent your brand goes a long way. Well-designed graphics allow you to connect with and engage your audience in a way that plain text simply cannot.
Images help your content stand out in crowded news feeds and allow viewers to quickly understand what you offer. Whether it’s an elegant Instagram photo or an attention-grabbing Facebook ad, custom visuals have become crucial to any social media marketing strategy.
Luckily, with the right skills, you can create stunning social media graphics using Photoshop. Knowing how to expertly use Photoshop tools and features to design custom images tailored for each platform will take your social media presence to the next level.

This post will walk you through the fundamental Photoshop techniques you need to craft polished graphics and visual content. You’ll learn Photoshop’s best practices for designing eye-catching social media images that represent your brand. Let’s dive into the essential skills every social media manager needs to start designing like a pro!
Getting Started in Photoshop
When designing social media graphics in Photoshop, the first thing you want to do is set up your document properly. Social platforms like Facebook, Instagram, and Twitter all have specific image dimensions that work best on their sites.
Open a new document in Photoshop by going to File > New. Then, you can customise the width, height, resolution, and background content to create a canvas optimised for each social platform you’re designing for. Refer to the current image specs for each platform so you start with the right dimensions.
Once your document is open, take time to familiarise yourself with the layout and key tools. The panels on the right side allow you to access things like layers, brushes, and shapes. You also have tool options along the top for cropping, selecting, drawing, and more.

Some essential tools to get to know are the layer panel, brush tools, shape tools, and selection tools. Layers will allow you to stack and organise different elements. Brush tools help customise and paint the image. Shapes add graphic elements like lines, rectangles, and circles. Finally, selections allow you to isolate and edit specific parts of the image.
Getting comfortable with the Photoshop interface and commonly used tools will make the entire editing process smoother. Now let’s look at how to use layers to take your social media images to the next level.
Working with Layers
One of the most important skills to master in Photoshop is working with layers. Layers allow you to stack different elements of your design so they don’t permanently alter your original image.
Think of layers like sheets of transparent paper stacked on top of each other. You can add design elements to each layer without changing the layers below it. This makes experimenting and editing so much easier.
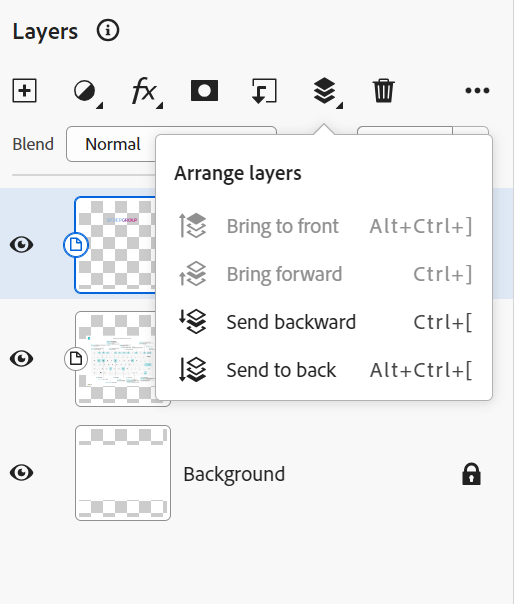
To add a new layer, click the Create New Layer icon at the bottom of the Layers panel or go to Layer > New > Layer. Give your layer a descriptive name like “Text” or “Logo” so you can easily identify it.
Once you have a layer, you can add elements like text, shapes, or imported graphics. Anything added to that layer will not affect the image on layers below it.
You can also duplicate existing layers if you want to reuse and edit elements. Right-click on a layer and select Duplicate Layer. This will create a copy you can modify without impacting the original.
Finally, when you’re done editing, you can merge layers. This permanently combines them into one single layer. Just click and drag one layer onto the other in the Layers panel or go to Layer > Merge Layers.
Using layers gives you so much flexibility to edit and experiment with different text, graphics, and effects. You can achieve the polished, professional look needed for effective social media posts.
Adding Text
Impactful text is crucial for conveying your messaging on social media graphics. In Photoshop, you have endless options for creatively integrating text into your image designs.
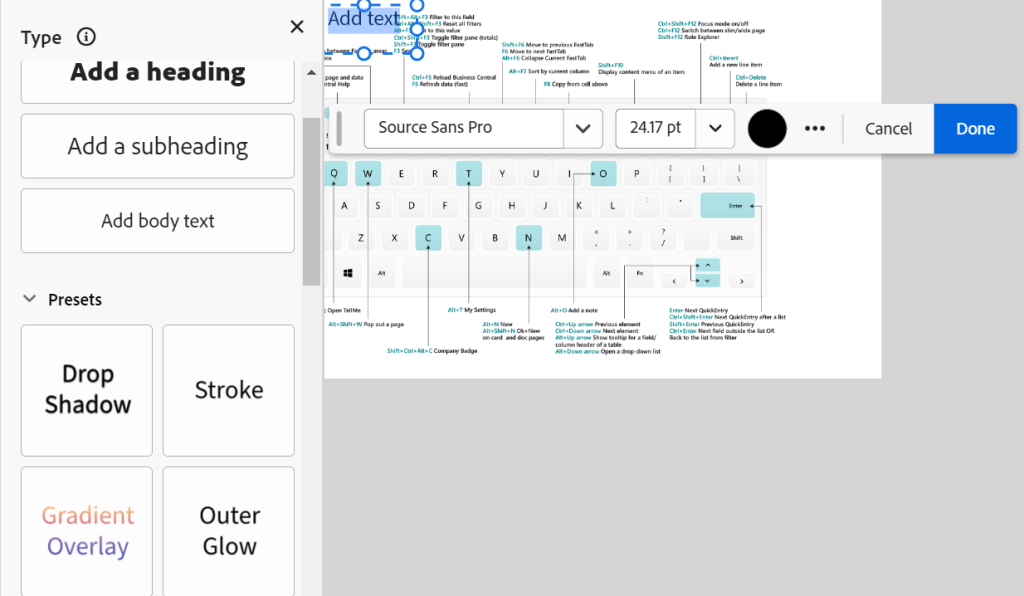
Customise the text tool by selecting the Horizontal or Vertical Type Tool in the toolbar. Then, choose a readable font and text size – anything from 18-80pt tends to work well for social graphics. Consider bold or condensed fonts for clear headings.
Be sure to add your text to a dedicated text layer above your photo layer. This will allow you to edit the text without permanently altering the image below. Position the text layer wherever you want your text to appear.
With your text layer selected, click anywhere on the image to start typing out your header, captions, or body text. You can place text across the top, bottom, or directly over your image.
Format the text appearance by changing the colour, alignment, tracking, leading, and more. Try different colours that contrast well with the background. Align text to the left, right, or centre. Leading (space between lines) should be 120-150% for easy readability.
Varying text sizes and styles is key for visual hierarchy. Use larger bold text for key messaging you want to stand out. Smaller text works for subheadings or longer captions.
With these tips, you can add polished text elements that grab attention and effectively convey information to your audience. Dynamic typography takes your social posts to the next level.
Using Shapes
Creative use of shapes is an easy way to elevate your social media graphics in Photoshop. Shapes add visual interest and can help direct the viewer’s eye.
The shape tools allow you to add pre-made geometric shapes, custom shapes, lines, and outlines. To add a shape, select the shape tool from the toolbar, then click and drag on your canvas to draw the shape. Add your shape to its own layer above your image.
You can access more complex shape libraries and install new custom shapes as well. Right-click your shape layer and “Edit Shape” to adjust the anchor points and contours using the pen tool.

Resize, flip, rotate or change the colour of shapes to fit your design. Overlap multiple shapes to combine them into interesting graphics.
Strategically layer lines, circles, rectangles, and other shapes over your image to highlight or accent the most important elements. For example, place a geometric accent shape behind your text to make it pop. Frame key parts of the photo using outlined shapes.
Don’t be afraid to experiment with bold and unusual shapes that capture attention. Used creatively, custom shapes can really take your social media image designs up a notch.
Finishing Touches
The final polish you add to your social media graphic can make all the difference. Use these finishing techniques to give your image that visually appealing pop.
Make selections around specific parts of your photo using the layer masks to isolate and edit just that area. For example, use the Quick Selection tool to select and desaturate the background. Or select and brighten just the product you’re featuring.
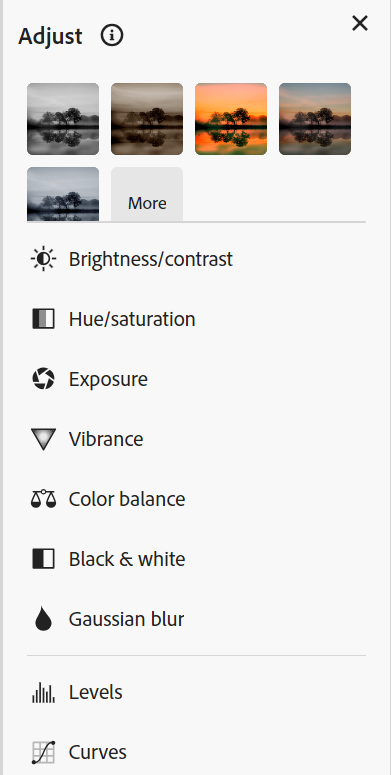
Don’t forget to adjust levels, brightness, contrast, saturation, and sharpness for the best photo quality. Enhancing these elements makes your images look more vibrant and professional.
For extra embellishments, try adding borders, textures, lighting effects, or shadows for more visual interest. Just don’t go overboard. Simple, clean finishes tend to look best for social posts.
When you’re done editing, export a high-quality JPEG or PNG. Make sure to choose the correct dimensions for where you plan to use the image. Compress large files to keep file sizes down for quick uploading.
Following this entire Photoshop process will equip you to craft stunning social media visuals customised for your brand. Well-designed custom graphics are guaranteed to elevate your social presence.
Conclusion
Creating compelling social media graphics using Photoshop is an invaluable skill for marketers. In this post, we covered the essential techniques you need to design stunning visual content.
You learned Photoshop best practices like setting up documents, using layers, integrating text and shapes, and adding finishes. Mastering these core skills equips you to customise polished graphics tailored for every platform.
Learning Photoshop gives you the power to produce consistent, high-quality images that represent your brand. You can craft cohesive posts, ads, and headers that grab attention and resonate with your target audience.
The benefits of unique custom graphics are immense. Standing out in crowded feeds, enhancing engagement, conveying information clearly, and telling visual stories are all possible when you implement these Photoshop techniques for social media.
Don’t wait to level up your visual social content. To learn these Photoshop skills and more in-depth training, consider the comprehensive Photoshop courses offered by Elliott Training. Our expert-led classes will equip you with the knowledge to take your social media graphics to the next level.
Get in contact with us today to learn how to take your social media images to the next level!